Concrete doesn’t have to be cold, grey and inexpressive. In fact, many have transformed this versatile material into a colourful art form. From intricate sculptures to beautiful exposed aggregate finishes and stamped patterns, concrete is as simple and humble as clay, yet it can achieve the hardness of a bunker. This makes it one of the most adaptable construction materials available.
In this article, we’ll guide you through the process of pouring a patio slab with an exposed aggregate finish, covering the necessary tools and equipment and providing some foundational knowledge for general concrete work. Remember that Beaver Tool Hire provides leading tool hire services throughout Hampshire and West Sussex, so feel free to explore our range or get in touch with your nearest hire desk for more information.
What Exactly is Concrete?
Concrete is a mix of water, sand, cement and coarse aggregate, with proportions varying based on the application. For example, mortar used primarily in bricklaying, consists of cement, water and sand, with a higher ratio of cement. On the other hand, concrete used for house foundations, patios or driveways has a higher proportion of sand and coarse aggregate—usually angular gravel that interlocks for added strength.
Concrete is most commonly used by pouring it into moulds to create walls, foundations, stairs and other structures. To prevent cracking, steel rods (known as rebar) are placed and tied together within the concrete for reinforcement and structural integrity.
Cement is the key ingredient in concrete, acting as an adhesive that binds the sand and aggregates. As the mixture cures through a chemical reaction, it hardens into what we recognise as concrete. While moulds shape concrete into walls and slabs, moulds may be used for artistic and aesthetic applications, such as manufacturing flagstone in various colours with natural-looking patterns.
What Is an Exposed Aggregate Finish?
Typically, when a slab is poured, it is finished with either a broom finish or a smooth finish. A smooth finish is ideal for a warehouse floor, while a broom finish is better suited for a driveway as it provides traction and reduces slipping. For an exposed aggregate finish, pebbles, glass or other hard materials are sprinkled onto the curing concrete and pressed in with a bull float. Although the aggregate is initially hidden, the cement paste on top can be washed off as the concrete hardens, revealing the aggregate on the slab’s surface.
Choosing the Best Material for Exposed Aggregate
Pebbles are the most common choice, offering good adhesion to the concrete and anti-slip properties. Avoid materials containing metals, as they can rust and deteriorate over time. Thin materials may not adhere properly, and soft materials may erode easily.
Exposed aggregate can be combined with stamped patterns, using different types of aggregate to fill various sections of the pattern, enhancing the aesthetics of the finished slab. There is no shortage of creative ideas when it comes to finishing concrete, but some ideas may require more skill than others, so it is best to start simple. In the following section, we’ll cover the steps taken in pouring a concrete patio slab with a basic exposed aggregate finish.
Pouring a Patio Slab with an Exposed Aggregate Finish
Before getting started it is important to consider the dimensions of the project and make an estimate regarding material quantities, costs, the number of workers needed and the time investment required. This will allow for precise planning.
Excavating and Preparing the Area
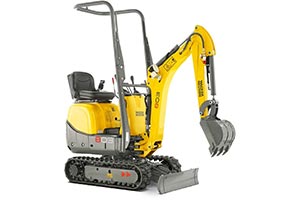
After careful project planning, start by marking the area to be excavated for the patio foundations, keeping in mind the drainage gradient and desired depth, and being mindful of underground utilities. Quality surveying equipment can make this stage much easier, with equipment such as laser levels and cable detectors. Depending on the dimensions of the slab an excavator or skid steer can be used. A 1 tonne micro excavator is able to both dig trenches and use the front blade for levelling terrain. This versatility as well as its small size make it ideal for a patio slab, as the foundation may not have to be particularly deep but well graded. Machines like skip loaders also come in handy for disposing of excess dirt.
Soil Compaction

After excavation, it’s essential to compact the base layer of soil for stability. A compactor plate is necessary for this task, with petrol or electric options available. Run the compactor over the base layer in overlapping passes to ensure even compaction, which helps prevent future issues like cracking or sinking.
Paving
Before beginning the paving process, you might want to consider adding a coarse aggregate sub-base. This extra layer enhances drainage and helps protect against moisture, while also creating a stable foundation for the concrete slab, ensuring long-lasting durability.

Several tools and pieces of equipment are essential for a smooth and successful paving process. A rebar tier will be required to secure the rebar in place, reinforcing the concrete and giving the structure added strength. Using a cordless rebar tier can significantly speed up this otherwise tedious task. You’ll also need forms, typically made from wooden planks or road forms, which act as barriers to contain the poured concrete as it sets. To ensure the concrete compacts properly and air pockets are removed, a concrete poker will be necessary.
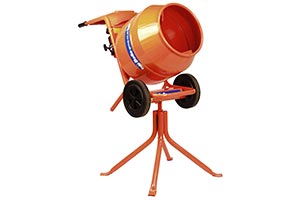
Additionally, a concrete mixer will be used to blend the cement with aggregates, while a wheelbarrow or similar container helps to transport the mixed concrete to the pouring site. Once poured, tamping and levelling the concrete is crucial, which can be achieved using tamps and screeds. To further refine the surface, floats will be used to smooth it out, with power floats providing extra compaction for a finer result.
Once everything has been set up, begin by placing the forms where the concrete will be poured. The rebar should be arranged in a grid pattern and tied at the intersections to ensure it stays in place. Mix the cement with the appropriate aggregates, such as sand and crushed stone or gravel, following the specific product instructions. Transfer the mixture into a wheelbarrow for easier handling, and as you pour the concrete into the forms, use tamps and screeds to level it. Afterwards, the surface can be finished and smoothed using the floats for a professional-grade result.
Seeding the Exposed Aggregate
One of the most common methods for achieving an exposed aggregate finish is seeding. After pouring, the coarse aggregate tends to sink while the thin cement paste rises to the top. Sprinkle the chosen aggregate on top and gently press it in with a float, ensuring the cement paste covers it completely. After a brief curing period, which varies depending on weather conditions, wash off the cement paste with a hose to reveal the exposed aggregate. In order to further ensure success, it is worth doing a test run with a small concrete mould which can be assembled out of wood planks. This will allow you to gain a better grasp of the nature of concrete and its behaviour before tackling a bigger project.
An exposed aggregate patio not only adds visual appeal but also offers long-lasting durability and slip resistance. By carefully planning, selecting quality materials, and using the right tools, you can transform a simple concrete slab into an attractive outdoor space. Whether you’re tackling this as a DIY project or hiring professionals, mastering the process involves attention to detail from preparation through to finishing. With the right approach, you can achieve a stylish and functional patio that will be the perfect setting for outdoor gatherings for years to come.
Choose Beaver Tool Hire for Concrete Working Tools
With an extensive range of mixers, pokers, compactors and concrete finishing tools, we’re the go-to for reliable tool hire in Hampshire and West Sussex. Our friendly team is always on hand to offer expert advice and guidance, helping you to choose the right concreting equipment for your project. And, with flexible hire options, you’ll ensure that you only have the tools you need, for as long as you need them.
Speak to Beaver Tool Hire today. With branches in Chichester, Petersfield, Waterlooville, Portsmouth, Fareham, Winchester – and our newest depot in Worthing – we are conveniently located to provide top-quality tool and equipment hire services throughout Hampshire and West Sussex.
Get in touch with your nearest branch today to find out about the tool hire solutions for your project. Our knowledgeable team is always happy to help.
Beaver Tool Hire branches:
Chichester Branch
Phone: 01243 782510
Email: hire@beavertoolhire.co.uk
Petersfield Branch
Phone: 01730 264804
Email: hire@beaverpetersfield.co.uk
Waterlooville Branch
Phone: 023 9225 9325
Email: hire@beaverdenmead.co.uk
Portsmouth Branch
Phone: 023 9266 3599
Email: hire@beaverportsmouth.co.uk
Fareham Branch
Phone: 01329 233731
Email: hire@beaverfareham.co.uk
Winchester Branch
Phone: 01962 790369
Email: hire@beaverwinchester.co.uk
Worthing Hire Desk
Phone: 01903 323331 / 07355 674080
Email: hire@beaverworthing.co.uk